Improving daily work is even more important than doing daily work
If you’ve read the excellent book on DevOps, “The Phoenix Project”, you’ll recognize the above quote. If you haven’t read it then I suggest you do so ASAP. It’s an easy read and entertaining for anyone who’s worked in IT. For and introduction to DevOps and Configuration Management, you can’t do better. I thought it appropriate for this post on automating storage management tasks with Ansible and NetApp.
Why did I choose Ansible? There are multiple automation and orchestration platforms out there that are highly capable. NetApp even has their own orchestration platform called WFA. If you’re interested in learning more about WFA I suggest starting with this excellent writeup from @triggan. I wanted a platform that met the following requirements.
- Short learning curve
- Agentless
- Developer friendly
- Programmatic access to NetApp Clustered Data ONTAP
Ansible checked off all but one of those requirements. Ansible is agentless and communicates with hosts via SSH. Ansible is written in Python (which was a big plus) and it’s open source. There are hundreds of modules that come with Ansible that allow you to automate pretty much anything in your datacenter. After an exhausive search on Github and Google, I was disappointed to find out there were no NetApp CDOT modules.
Python and NetApp’s Manageability SDK to the rescue. Since there weren’t any pre-built NetApp modules I decided to build my own. Because Python is a first class citizen in Ansible and NetApp provides a Python API I’m able to develop custom modules. Since I’ve done all the work on the backend you get to take advantage of these modules without knowing any Python. All you need is the ability to write Ansible playbooks to get started on automating NetApp CDOT storage.
Playbooks are the building blocks of Ansible. A playbook is a YAML files made up of individual tasks (modules) that describe your goal. Below is a snippet of a playbook I created to configure a CDOT array.
---
- hosts: localhost
  name: cDOT Configure
  connection: local
  gather_facts: false
  vars:
    user: "admin"
    pwd: "badpass"
    array: "atlcdot"
    ansible_python_interpreter: /Users/jeorryb/virtualenvs/ansible/bin/python
  tasks:
   - name: Rename Aggregate
     aggr_rename:
       cluster: "{{ array }}"
       user_name: "{{ user }}"
       password: "{{ pwd }}"
       aggr: "n1_aggr_root"
       new_aggr_name: "n1_aggr_root_test"
   - name: Rename N2 Aggregate
     aggr_rename:
       cluster: "{{ array }}"
       user_name: "{{ user }}"
       password: "{{ pwd }}"
       aggr: "n2_aggr_root"
       new_aggr_name: "n2_aggr_root_test"
   - name: Change date time
     date_time:
       cluster: "{{ array }}"
       user_name: "{{ user }}"
       password: "{{ pwd }}"
       timezone: "America/Chicago"
       date: "02/29/2016 16:03:00"

   - name: Create NTP Server
     ntp_create:
       cluster: "{{ array }}"
       user_name: "{{ user }}"
       password: "{{ pwd }}"
       ntp_server: "ntp1.gatech.edu"
...
As you can see, the playbook format is easy to read and understandable even to administrators that might not be that familiar with NetApp. This so called “Infrastructure As Code” style is another reason I chose Ansible. I’ll point out a couple of details. The “hosts:” variable is used to describe where you want your modules to be run. Since we can’t run Python natively on a NetApp CDOT array (at least not yet!) the playbook is run from localhost. The modules also assume that have added the location of the NetApp Manageability SDK to your PATH environment variable. You can also set other variables that can be reused for different tasks in the playbook under the “vars:” parameter. There are a ton of built-in variables that can be used with Ansible that I won’t go into here. Ansible documentation is excellent and I suggest you read it for more information. Ansible also utilizes the Jinja2 templating engine which allows us to perform for-loops, ranges, etc. from within playbooks. I’ll be demonstrating some of these in future posts.
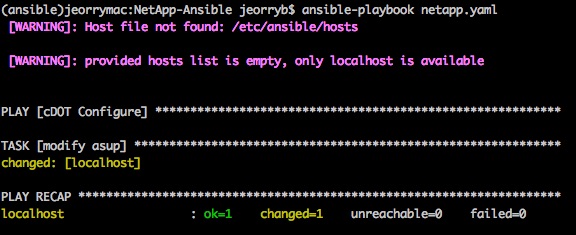
All of the custom modules can be found here on Github. If you clone the repository and run your playbook from that directory all the modules in the “library” folder will be available for use. Running a playbook is a simple as running the following command.
ansible-playbook netapp.yaml
The output displays if the tasks in your playbook completed successfully or why they failed.
Ansible strives to be idempotent. That’s a fancy word for making changes only when they are needed. The majority of NetApp commands are idempotent by default but I’m still working to make sure the modules are truly idempotent when it makes sense. I’m currently in the process of getting these modules added to Ansible’s official extra’s repository in which case you will no longer need to use a custom modules folder.
If you’re interested in developing custom modules yourself I highly recommend the resources below. They were instrumental while I was creating my own.
- Ansible - Developing Modules
- James Cammarata - Phillips Hue Light Modules
- Jason Edelman’s Ansible for Networking
I hope this encourages you to give Ansible a try. We should all be striving to improve our daily work through the use of automation.